![]()
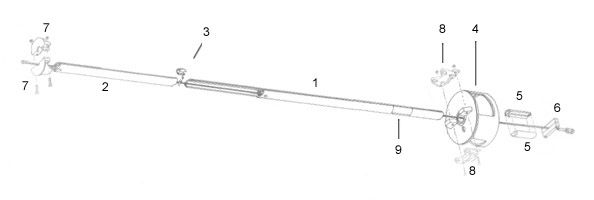
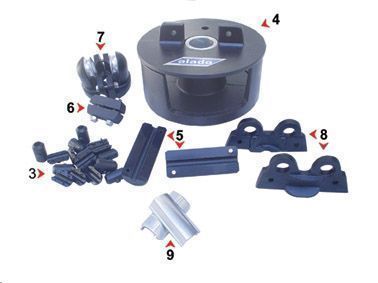
1. Interlocking foil-halves, 5’long.
2. Two interlocking foil-halves, 2.5’ long.
3. Nylon foil bushings. One per foil-half.
4. Furling drum and housing.
5. Polypropylene centralizer for furling drum (4" long for A0-A2; 5 7/8" long for A3-A4; 71/2" long for B series).
6. Polypropylene stay clamp.
7. Top foil terminal. Two halves, with aluminum sheave.
8. Bottom foil terminal. Two halves.
9. Two aluminum luff feeds.
1. Length of 1/4" dia. rope (or 5/16" for A3-A4 and B series) to be used as the genoa halyard. Should be at least 2' longer than double the length of the forestay. Two, if more than one genoa is to be used.
2. Length of 5/16" dia. rope (or 3/8" for A3-A4 and B series) to be spooled around the drum for a furling line. Should be 1.5 times the boat length, or 2.5 times the length of the genoa foot.
3. Blocks to lead the furling line from the drum to the cockpit.
1. Two 7/16" (and 1/2" for A3-A4 and B series)end wrenches.
2. Two vice grip pliers.
3. Hacksaw.
4. File.
5. Tools as necessary to detach the forestay from the deck fitting on your boat.
6. Lubricant such as vaseline, WD-40, or teflon for sliding foil-halves together. They are shipped lubricated with vaseline.
1. Put the foil bushings on
the stay.
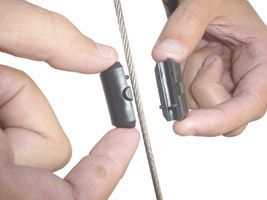
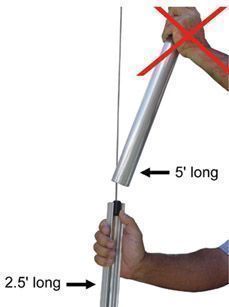
2. Select one 5’ foil-half and one 2.5’ foil-half. Orient them so that the holes are at the top.
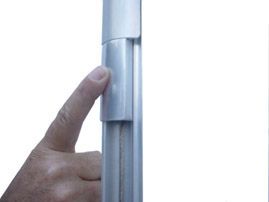
3. Place the concave side of the 5' foil-half, against the stay. Fit the highest bushing into place by inserting the pin of the foil bushing into the hole of the 2.5’ foil-half.
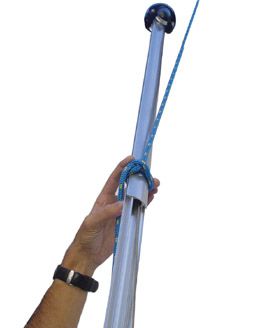
4. Using the thumb to secure the foil bushing, fit the bottom of the interlocking grooves of the 2.5' foil-half into the top of the 5' foil-half and, holding them exactly in line, slide it upward until the upper ends coincide. A little lubrication may be helpful.
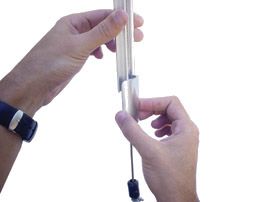
Hold the foil halves by their
ends.

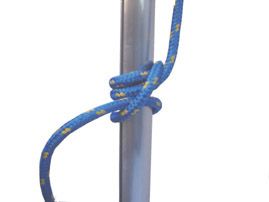
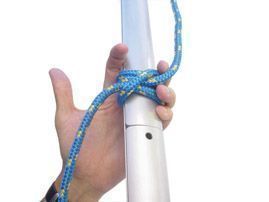
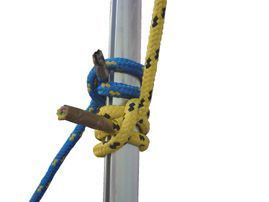
5. Using the original foresail halyard, put a rolling hitch onto the foil, which will grip the foil when the halyard is tensioned and allow the foil to be slid upward by hand. If the original halyard is cable or wire rope, use a little piece of nylon line to protect the aluminum.
6. Attach the top terminal, capturing the upper end of the foil assembly between the two top halves and reeve the genoa halyard through the sheave in the top terminal. Join the bitter ends of the halyard, or make them fast to something, so they do not come out during the rest of the installation.
Note: If you want to install two headsails, you should reeve two genoa halyards.
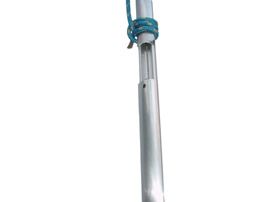
7. Adjust the rolling hitch on the foil until it is just above the two halves that form a complete foil. Tension the halyard, thereby raising the foil, until the hitch is about 7' above the deck. Cleat the halyard at this height.
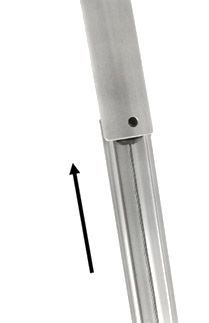
8. Place another foil-half against the stay, hole at the top, and fit the pin of another foil bushing into the hole.
9. Holding the bushing in place with one hand, fit the interlocking grooves of the foil-half into the one already installed and slide it upward as far as it will go.
NOTE: hold the foil halves by their ends.
10. Push the foil upward to release the halyard tension in order to allow the foil to be slid upward through the rolling hitch. Continue to rise it up to the point where the halves that form a complete foil are just above the knot.
11. Repeat steps 8 through 10 until no more foils can be fitted on the stay without detaching the stay from the deck fitting.
12. Haul on the halyard supporting the foils until the top terminal touches the masthead stay terminal.
13. Installation of the final foil-halves and the luff feeds.
The objective now is to install the opposing luff feeds and trim the bottom foil sections so that the drum will be at the desired height on the stay and the bottom ends of the foil-halves will coincide. To do this you will have to cut one or more sections of foil-half.
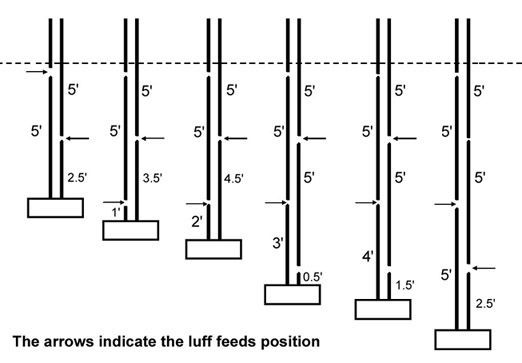
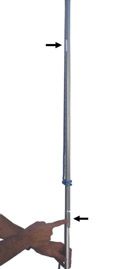
Joints between foil-halves should be at least 1' apart to maintain torsional strength of the foil. The height of the luff feeds above the drum is not critical. They should normally be between 1' and 5.5' above the lower stay terminal (see the diagram). For most boats, this nicely accommodates handling of two sails.
A general rule is: with the foil terminal tensioned against the top stay terminal, leave about 10" between the bottom of the foil and the top of the lower stay terminal. Whenever possible, take advantage of the existing overlap in foil-halves when fitting the luff feeds.
Example of situations
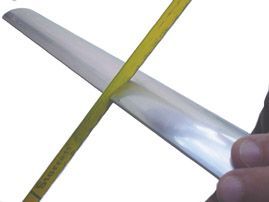
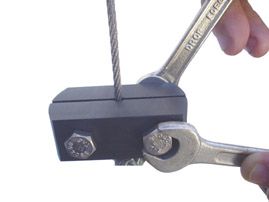
14. Place a vice grip on the stay below and against the foil before turning away to do the cutting.
15. Cut the appropriate lengths of foil-halves and dress them with a file.
16. Secure the foil in position with a line from the bow pulpit. The best place to tie to the foil is around the hitch in the boat halyard.
17. Use other boat halyards to secure the mast if necessary. Only then, loosen and remove the forestay from the deck stay fitting.
18. Slide the luff feed and short section of already cut foil-halves, with their respective bushings, up against the vice grip. Leave the vice grip clamped to the stay.
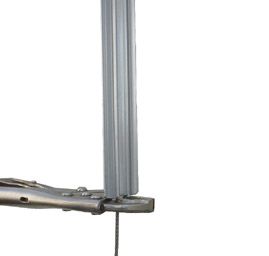
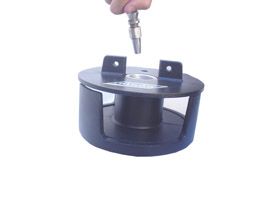
19. Put on the drum. The central opening in the spool is 1 1/2" in diameter (A0-A2), or 2" (A3-A4), or 2 1/2" (B series).
21. Attach the stay to the deck fitting and tension it.
22. Remove the vice grip between the drum and the foil.
23. Put on the drum centralizer.

24. Put the polypropylene clamp on the stay below the drum and tighten it.
25. Remove the remaining vice grip.
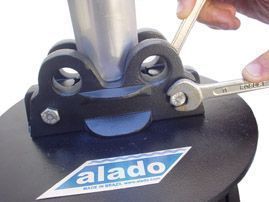
26. Put the foil terminal base on the drum without tightening it.
27. Loosen the rolling hitch securing the foil allowing it to slowly slide into the foil base.
28. Tighten the bolts on the foil base.
29. Free the boat's halyard and line attached to the bow pulpit.
30. Free the other boat halyards used to stabilize the mast.
The roller furling is installed. CONGRATULATIONS.
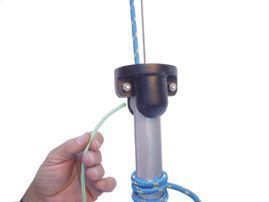
1. Tie one end of the 1/4" (or 5/16" for A3-A4 and B series) halyard to the top of the genoa, feed the luff rope (or luff tape) into the luff feed and tension the halyard.
2. Haul on the halyard, guiding the luff rope into the luff feed, until the tack of the genoa is at the appropriate height to attach it to the drum.
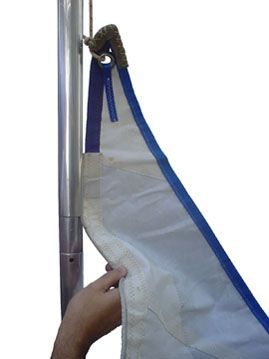
3. Make the tack fast to one of the eyes in the foil base with a short rope or shackle.
4. Tension the halyard and tie it off to the other eye in the foil base.
Note: A purchase with knots or small blocks can be made to achieve more tension on the halyard. Or, this can be placed on the tack as a downhaul if there is space. W hen using foils, wind load on the luff rope is more evenly distributed than when hanking the sail on the forestay. Therefore, luff tension does not have to be as much to keep wrinkles out of the sail.
5. You should now have a quantity of furler halyard equal to the length of the stay piled up on the deck. Cut off and save this excess, leaving about 1' extra on the furler halyard. It can be used later to lower the sail. The 1' excess should be wrapped around the foil, below the tack and secured. There are alternative ways to conveniently lower the sail. See USING THE ROLLER FURLING SYSTEM, Item 4.
6. Our system was projected to allow you to raise two headsails at the same time, and independently. If you wish to raise a second sail, you need to have a second halyard previously installed (see Item 6, in the installation section), and repeat steps 1 to 5.
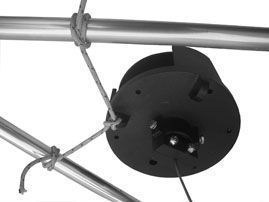
7. Using a short rope, tie the drum to the foredeck fitting at the same height of the drum and preferentially at two points with the widest angle between them so the drum will not rotate. Do not make a final choice of this location until you have installed the furling line (step 9). There is little torque generated when the drum rotates.
8. Attach the sheets to the clew of the genoa and rotate the drum manually until the sail is completely furled. Then rotate it 6 more turns so that the sheets are partially wound around the sail. If UV protection is sewn on the leach and foot of the sail, turn the drum so that this cloth will be on the outside when the sail is furled.
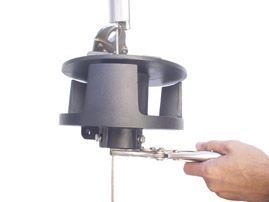
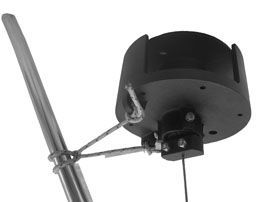
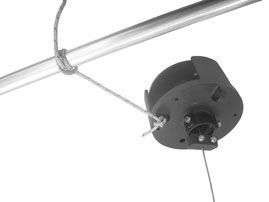
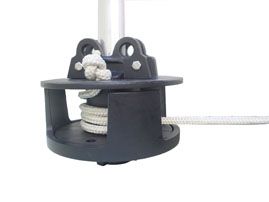
9. Pass one end of the furling line through a window of the drum housing and then through the hole in the top of the drum. Tie a figure 8 knot in the end of this line to secure it.
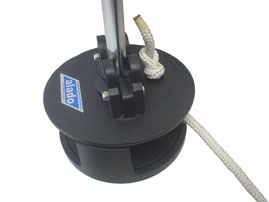
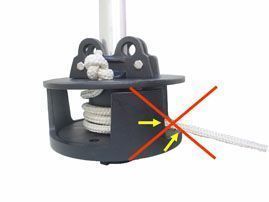
10. Lead the furling line to the cockpit through one or more blocks. In positioning these blocks it is important to locate the first block so that it is in the plane of the base of the furling drum and does not chafe on the window of the drum housing. It may be necessary to reorient the drum housing to avoid this chafe. Now choose where you want to permanently tie off t he drum housing.
The roller furling system is now ready for use.
1. To unfurl the genoa, uncleat the furling line and pull on the leeward sheet. It is very important to hold some tension on the furling line.
2. To furl the genoa release the sheets and pull on the furling line. Holding some tension on the leeward sheet will result in a smoother furl.
3. You should never forget to cleat the furling line after furling the sail. Especially, if you are leaving the boat. This will prevent the sail from unfurling during a strong blow. There are holes in the bottom of the drum and housing where you can also pass a rope or padlock as an additional security measure.
4. On cruising boats with furling systems, the sail is seldom lowered once it is up. If you want to lower the sail, there are three simple alternatives, which use the section that was cut off the furler halyard. The first is to bring the bitter end of the furling line forward through its lead blocks and tie it to the bitter end of the furler halyard. The second is to use the sheet to do this role. The third is to make the mast halyard "endless" by tying its bitter end to the end that normally attaches to the sail top. Then tie the bitter end of the furler halyard to the mast halyard so that when the genoa is lowered, and the furler halyard is carried aloft, it can be pulled down again with the mast halyard.
The second sail has its own pair of sheets. Even having four sheets now, you will only have two sheets under tension. If you are sailing close to the wind then the second sail will be placed side by side with the first one and it will have no action at all. It will be kept there as a hidden sail, and its two sheets will have no strength.
If you are running with the wind using the two genoas on opposite sides (goosewind) then you will have to handle two sheets: one sheet for the first sail - another sheet for the second sail. Also you should have the mainsail lowered for a better cruising.
If the wind increases you may wish to reef. That can be accomplished by pulling the furling line and the two genoas will be reefed altogether. Therefore, this goosewind system has some advantages over a spinnaker, such as:
a) You can lower and raise each genoa independently. A spinnaker pole is no more necessary as each genoa directs wind to the other and the entire system is supported by the headstay; and
b) You can reef the two genoas altogether. It is now possible to have a very fast course changing, from going down with the wind to close to the wind, just by operating the tiller and the sheets.